Vacation – ironically, in wargaming context, this word means for me at least no games and very little painting. Thus, there is very little to write about… which in turn leads us to the next (and probably last) instalment of “filler” cycle of articles about my experiences with GHQ Terrain system.
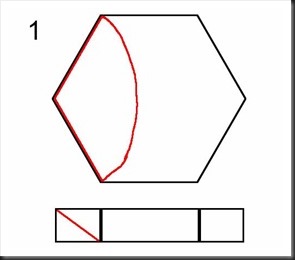
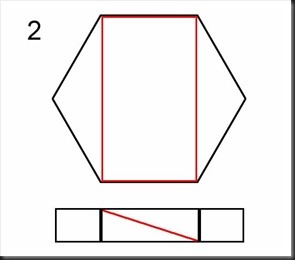
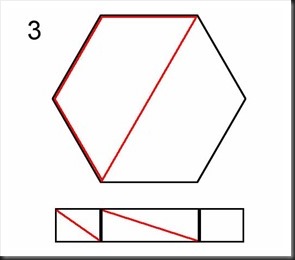
Since GHQ Terrain system is hexagon based, making hills are pretty straight forward – you take a hexagon and cut it up in two or more subsections. There are three basic cuts you can make, as shown in the pictures below, each variant giving two useable hill “pieces”.
Couple of things to keep in mind when making the cuts:
- The initial alignment of the cut is the most important part of the cutting process. Once you progress “into” the hexagon, mistakes or messy cuts can be easily fixed, but a bad initial cut will result in hill pieces not aligning with each other. This in turn will result in sloppy visual effect.
- In the images below, the cut line is marked with red lines. Keep however in mind that once the cut progresses into the hexagon, you can cut whatever shape you want, as long as the diagonal lines at the edges are consistently aligned.
- Try to keep the cut on the horizontal surfaces of the hexagon at least one centimetre away from the red line in my pictures. This will give you a ridge with a horizontal surface, a very useful “feature” when trying to place miniatures on the top of the hill.


Let’s now take a look at different hill shapes and how useful they are. Figure 1 will give you one “short” hill edge and large one “indented” hill side. In my experience, you will need a whole bunch of those “short” pieces – try to make at least ten of those in your first batch. The other piece is far less useful. Observe however that with some care when cutting, it is possible to get two “short pieces out of single hexagon – something definitely worth considering when working with the initial batch of hill pieces.
Figure 2 is pretty straight forward – this cut will give you two identical “linear” hill slopes. Those are very handy for creation of those long ridges, stretching over large parts of the battlefield, but are of limited usability when trying to make terrain with a lot of smaller elevations. For the initial batch, I would recommend for six, maybe eight such pieces.
Finally, the cut shown in figure 3 provides one hill piece necessary to “expand” the hill slope 60 degrees outward and one hill piece that “retracts” it 60 degrees inward. Both variants are equally useful, but keep in mind that you will need the “retracting” pieces much more for terrain setups with many smaller elevations.
Personal experiences, troubleshooting and variations on the themes
The guide that follows with each pack of GHQ Terrain hexagons shows you different cut variants. Its illustrations are much more instructive than pictures I’ve included with this post, so take a moment and study them.
Guide’s suggestion to use a saw to make the cuts is however not so nice. I tried to follow this advice initially and found out very quickly that cutting styrofoam with a saw makes incredible mess. Furthermore, saw cuts give very rough surfaces and if I am to be perfectly honest, working with saw felt generally like a bit of a hassle. So no, I would not advise you to use saw for this job. Instead, invest in a proper wire foam cutter.
Now, cutting the hill pieces with foam cutter presents its own set of challenges. First and foremost, if you set the temperature of the wire too high, you may find it difficult to control the cut. Try to find a temperature that allows you to make the cut easily, but you should feel a bit of resistance while slicing through the hexagon. Biggest challenge for me personally was to keep correct alignment of the wire when “exiting” the hexagon, especially when making the tiny “corner” pieces shown in figure 1. After a while I decided to bypass this problem by making two “halfway” cuts instead of a single one – one cut from each side, meeting (hopefully) in the middle of the hexagon.
As with everything else, experience comes with practice, so don’t worry if you make a mess out of a couple of hexagons. Keep in mind though that even if you make a “bad” cut, don’t fret over it. Unless you manage to really butcher the hexagon, most mistakes are easily corrected with some filler; my personal favourite is smooth wall putty. It can be purchased in any DIY shop in plastic tubes – one of those will last you forever. Wall Filler is also quite useable for creation of variations in slope shapes – you can use it to make the slope gentler, more irregular or to create narrow “fingers” that extend from the main hill piece.
To mount or not to mount
Once you cut your first hillside piece, you will probably immediately notice one thing – the lower part of it is very fragile indeed. This is especially evident when working with the hexagons that are 1/4” thick. Now, you may of course be of different opinion, but my personal view is that hillside pieces cannot be used on their own and need to be mounted on another hexagon. Yes, this means that you will need to use two hexagons for single hill slope hex, thus doubling the price of the terrain piece.
White glue can be used to glue two pieces together, but personally I prefer to use contact glue specially made for styrofoam. Woodland Scenics sells such a glue, but see if you can’t find it (usually for significantly less money) in your local DIY shop.
No comments:
Post a Comment